Broadcast template:
- Select Manage Template on drop-down menu list
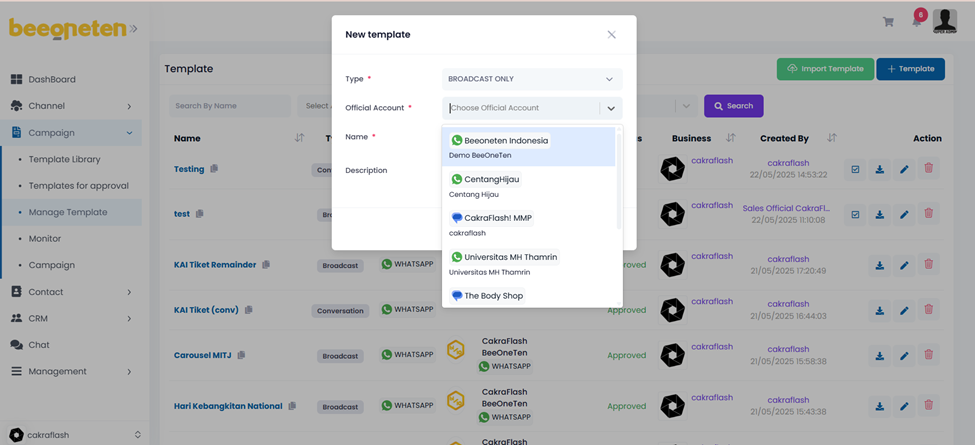
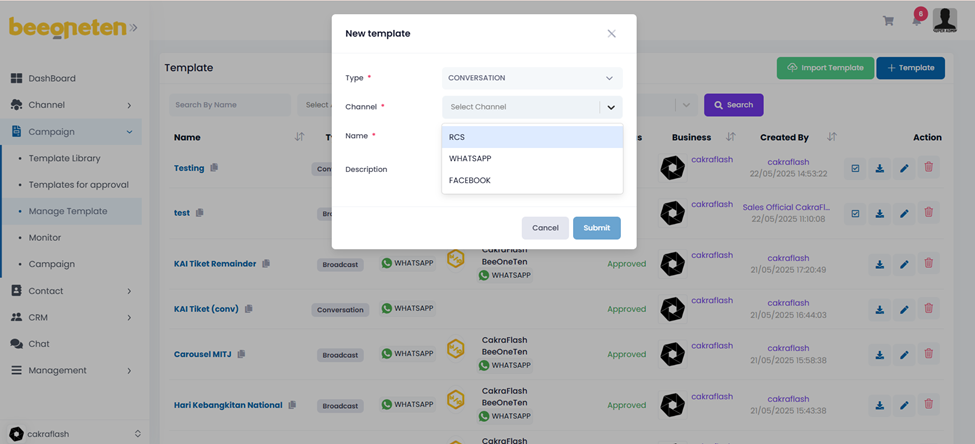
- Click on + New Template
- Select the Official account associated with the broadcast template you want to create
- Check the type of messages below to understand the features of each type of message.
- Set Expire type:
- Set by campaign: The broadcast template will be based on the configuration of each campaign you create.
- None: not set expire time for template.
- Expire time: set the exact date and time for the expiring => once expired, the status of all messages as Sent will change to Failed.
- TLL: specify the expiration time for a template, for example 1 hour, 2 hours, 1 day….etc…. => the time is calculated from when the template is sent.
- For conversation templates, there is no need to select an Official account because one conversation template can be used for many different OA (of course, it must be the same channel).
| No | Element | Description | Reference URL/Input |
| 1 | Name Mandatory | Your template’s name | Test1 |
| 2 | Type Mandatory | Your template’s type Note: For Whatsapp, broadcast messages need to be approved by Facebook or Sinch. Check 5.7 for how to create broadcast templates for Whatsapp. | Broadcast only: only display broadcast [1 message only] Conversation: display conversation [multiple messages] |
| 3 | Channel Mandatory | Select channel you would like to use for sending message | RCS Facebook Whatsapp |
| 4 | Description Optional | Describe your template | Test RCS message |
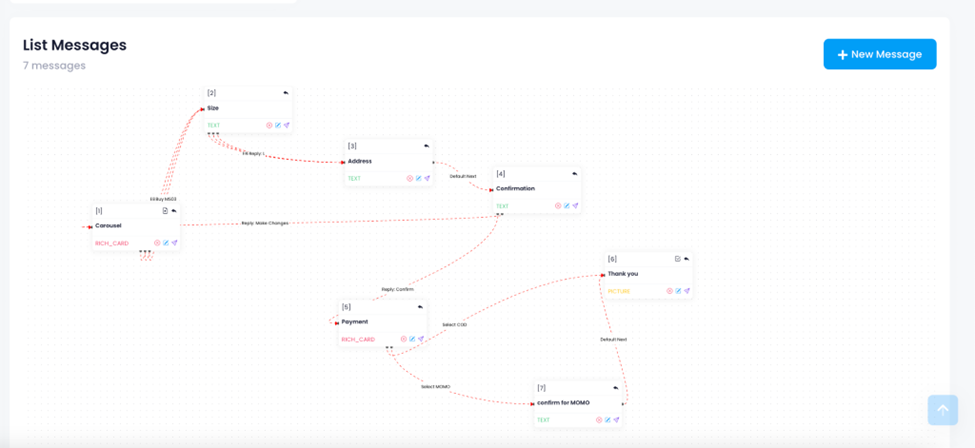
- Click directly on the template’s name you would like to create question flow (list of questions)
- Click on the New questions button to start
- Input the information for your template.
| No | Element | Description | Reference URL/Input |
| 1 | Question ID Mandatory | Use to combine with Question name to identify your question. Very important in creating the question/message flow. Users will use this QuestionID-Question name to specify the question/message which should appear next in the flow. Example: Question ID : 1 Question Name : Request basic info Identifier of this question would be: 1-Request basic info | |
| 2 | Question Name Mandatory | Use to combine with Question ID to identify your question | |
| 3 | Type Mandatory | The type of message you want to send to your customers Note: Please check the Types of message below for more information | Rich Card: up to 6 Text Picture Video File: pdf is not applicable for RCS |
| 4 | Next Question Base On Mandatory | Set up trigger for next message | User answer Script |
| 5 | Answer ID Optional | Configure the variable so that it can be displayed in the following questions/messages Example: Set answer ID as ‘name’ If a customer inputs the name as John and in the next sentence we put in the description: Name: {{{name}}} It will display as follows: Name: John | Use this configuration to display customer input: {{{answerID}}} |
| 6 | Status Mandatory | Set up the questions/messages so that the system recognizes the flow of the list of questions. | Start: Use for 1st question/message Normal: The questions/messages are in the middle of the question flow Complete: Use for last question/message Error: Use for displaying error while user input information is not in the preset data. |
| 7 | Next Question Optional | Use to arrange the question/message which should appear next in the question/message flow of the list of questions.  | Example input: 3-Accept |
| 8 | Add suggestions Optional | Use to set buttons for messages.  Note: Type of button: 3 typesText button: Input name of buttonPost Back Data: data will be returned/saved when the button is pressed.Select…: select the message that will appear next after the button is pressed Note: Type of button: 3 typesText button: Input name of buttonPost Back Data: data will be returned/saved when the button is pressed.Select…: select the message that will appear next after the button is pressed | Type of button: REPLY: direct to next message DIAL: call the phone number configured in Post back data OPEN URL: open URL configured in Post Back data Up to 6 buttons |
| 9 | Add API Optional | Implement API calls such as GET or POST….etc… to your own or 3rd party APIs.  Note: API call: select API command typeput the API url in to make API calls Event: choose whether the API call event occurs before or after Failed Action: choose next action if API call failed Failed Message: Set the message that will appear when the API command has an error API Resp Variable Note: API call: select API command typeput the API url in to make API calls Event: choose whether the API call event occurs before or after Failed Action: choose next action if API call failed Failed Message: Set the message that will appear when the API command has an error API Resp Variable | API Call: GetPost Event: BeforeAfter Failed Action: Show error messageNext message Failed Message: Show error message: configure manually error messageNext message: select the message that appears after the Api call failed |
| 10 | Is need reply | If selecting this option, you will need to input a response before moving on to the next message.  Note: for the first Viber message, the option will always be activated. Note: for the first Viber message, the option will always be activated. |